Camera Advance Lite App : If you are looking for a better camera app than the one you have on your Android phone then this is the one for you. This app is one of the best camera apps for Android. It has most of the features you would look for in any Android camera app. Interesting features of this app are picture effects, live histogram, timer, burst photo capturing, panorama mode, silent shutter and much more. All the photo effects are displayed at real time unlike other camera apps where picture is processed to apply the effects after photo is taken. With this camera app you can see the outcome of selected color effect at real time within camera view finder and you can know how photo would look like if taken.
Camera View Finder : When you start Camera Advance app then you would see the view finder of this app with various camera controls around it as shown in screenshot below.
 |
| Android Camera App - View Finder |
At right hand top corner of the screen is number in green color, it indicates count of photos taken so far. Just left to number count is image which indicate that photos are being saved at SD Card. The camera icon at right hand and vertically center location is for taking the snaps. Tap this camera icon to take the photo. The toolbar at the left of the screen provides various features available with this camera. Let's see those one by one.
Shooting Modes : First icon from top in the toolbar is for selecting shooting modes. Tapping this icon would display available shooting modes as shown in screenshot below.
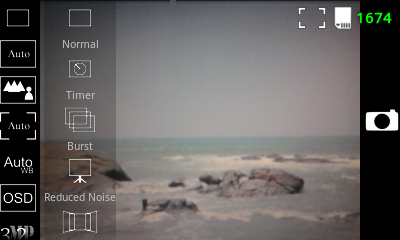 |
| Android Camera App - Shooting Modes |
By tapping appropriate icon, you can choose from Timer, Burst, Reduced Noise and Panorama. Selecting Timer mode will delay the shutter time by specified seconds. Burst shooting mode allows you to take multiple photos in single tap. Panorama allows you to take wider photos than those fit in your camera view.
Scene Modes : Second icon from top in the toolbar is for selecting scene modes. Tapping this icon shows scene modes to select from, as given in screenshot below.
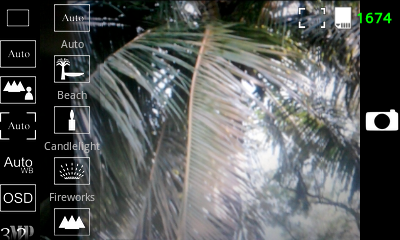 |
| Android Camera App - Scene Modes |
Tap the scene mode you want from Auto, Beach, Candlelight, Fireworks, Landscape, Night, Party, Portrait, Snow, Sports and Sunset. You should choose the appropriate scene mode to match the kind of snap you are taking. You can swipe the tool bars vertically with finger to scroll and see more available options.
Color Effects : Third icon from top in the toolbar is for selecting color effect. Tapping this icon would display color effect choices as shown in screenshot below.
 |
| Android Camera App - Color Effects |
When you select one of the color effects by tapping related icon then view finder image immediately start displaying the photo preview with selected color effect. You can choose from No Effect, Aqua, Mono, Negative, Sepia and Whiteboard. The last option, whiteboard gives the photo with line drawing or pencil drawing effect.
Focus Modes : Fourth icon from top in the toolbar is for selecting focus mode. Tapping this icon shows two focus modes to choose from, as given in screenshot below.
 |
| Android Camera App - Focus Modes |
There are only two focus modes to select from, Auto and Macro. Choose Auto mode when you are taking snap of the targets which are away from you. For taking snap of small things from very close distance choose Macro mode. Macro mode switches camera to a special close focus mode which could be closer than 10 cm
To understand the difference between Auto and Macro mode, perform this exercise. Select Auto mode and focus on object from very close distance. Notice the sharpness of picture. Do the same with Macro mode selected. This would help you understand how Macro mode gives you sharper snaps from very close distance.
White Balance Modes : Fifth icon from top in the toolbar is for selecting white balance mode. Tapping this icon shows various white balance options to apply.
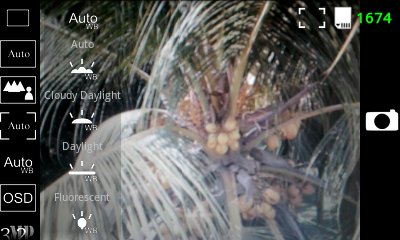 |
| Android Camera App - White Balance Modes |
Tap the relevant icon to select the white balance mode from Auto, Cloudy Daylight, Daylight, Fluorescent and Incandescent. You should choose the appropriate white balance mode depending on your environment lighting condition and the way you want your photo.
OSD : Sixth icon from top in the toolbar is for selecting various "On Screen Display" (OSD) features. Tapping this icon would display available OSD features as shown in screenshot below.
 |
| Android Camera App - OSD - Histogram |
There are three OSD options to choose from, Histogram, Grid and Fibonacci Spiral. Unlike other camera settings you can select more than one OSD at a time. Tapping it first time will display it and tapping the same icon again would hide it. So you can display all three OSDs at same time if required. Above screenshot shows one of the OSDs selected, that is Histogram. Histogram tells you if photo your are looking in view finder is properly exposed to light or not. It gives an idea if you are capturing the details in shadows and highlight areas of the photo. If peak of the histogram is at center and graph is decreasing equally to both sides then it is just perfect exposure to snap the picture. Left edge of the histogram indicate shadow area and right edge indicates highlight area.
Picture Sizes : Seventh icon from top in the toolbar is for selecting picture size. Tapping this icon would display available picture size that you want to select for taking photos.
 |
| Android Camera App - Picture Sizes |
You can select the picture sizes from 1.3, 2.0 and 3.2 mega pixels (MP). Higher the value you select larger the picture size you get and more details in picture.
Picture Quality : Eight icon from top in the toolbar is for selecting picture quality. You can see the various picture quality options available for selection by tapping this icon.
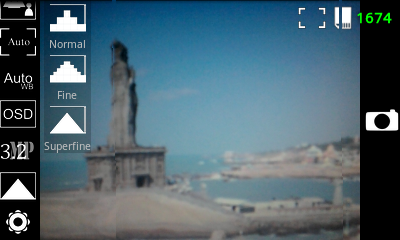 |
| Android Camera App - Picture Quality |
As shown in above screenshot there are three picture qualities to choose from, Normal, Fine and Superfine. Finer the quality you select, better the picture quality. For memorable pictures you should select Superfine quality.
Camera Settings or Preferences : The last icon in toolbar launches preferences screen which allows you to fine tune the behaviors of this Android camera app.
 |
| Android Camera App - Settings |
Using preferences screen you change the settings for Burst, Panorama, Timer, Save Location, Date Format, Geotag, Picture Review, Shutter Sound and Zoom control by volume button.
The quality of the photographs taken using this camera app is really good. Color effects are amazing. The amount of control and features are excellent considering this app is absolutely free. You can download this app from Android market or app store of your choice.
If you liked this app then you may would like to check out few more Android apps from popular section at right. Keep coming back for more coolest and best apps for Android.


No comments:
Post a Comment